Help
How to Use PSL Secure File Exchange
How to Use PSL Secure File Exchange
(Sending Files with Sensitive Data to Our Office)
Start by logging onto our PlanSponsorLink website: Login
Your login will always be the email address that our office has on file for you. For first time users, please select the option First Time User? and it will walk you through setting up a password for your account. For return users, your password will have been setup by you and should be something you remember. If your Username and Password combination does not work, please check that both are filled out correctly. (the password is case sensitive) If you are still unable to log on, please select the Forgot Password? Option and follow the on screen instructions to reset your password.
Once logged into the site, locate the Secure File Exchange Tab on the Home screen
Logging into PSL
Logging into Pension Pro
You have received an email that is notifying you to log onto the Nexus Secure Web Portal called PlanSponsorLink and to begin the Annual Data Collection. You can access your portal through the following link https://ava.plansponsorlink.com or by clicking the link in the email you have received from our office. The link will bring you to the website below.
Your login will always be the email address that our office has on file for you. For first time users, please select the option First Time User? and it will walk you through setting up a password for your account. For return users, your password will have been setup by you and should be something you remember. If your Username and Password combination does not work, please check that both are filled out correctly. (the password is case sensitive) If you are still unable to log on, please select the Forgot Password? Option and follow the on screen instructions to reset you password. If you still are unable to log on, please contact our office for assistance at (559) 447-1600 and state that you are having trouble logging onto PlanSponsorLink and for which plan.
Starting Data Collection
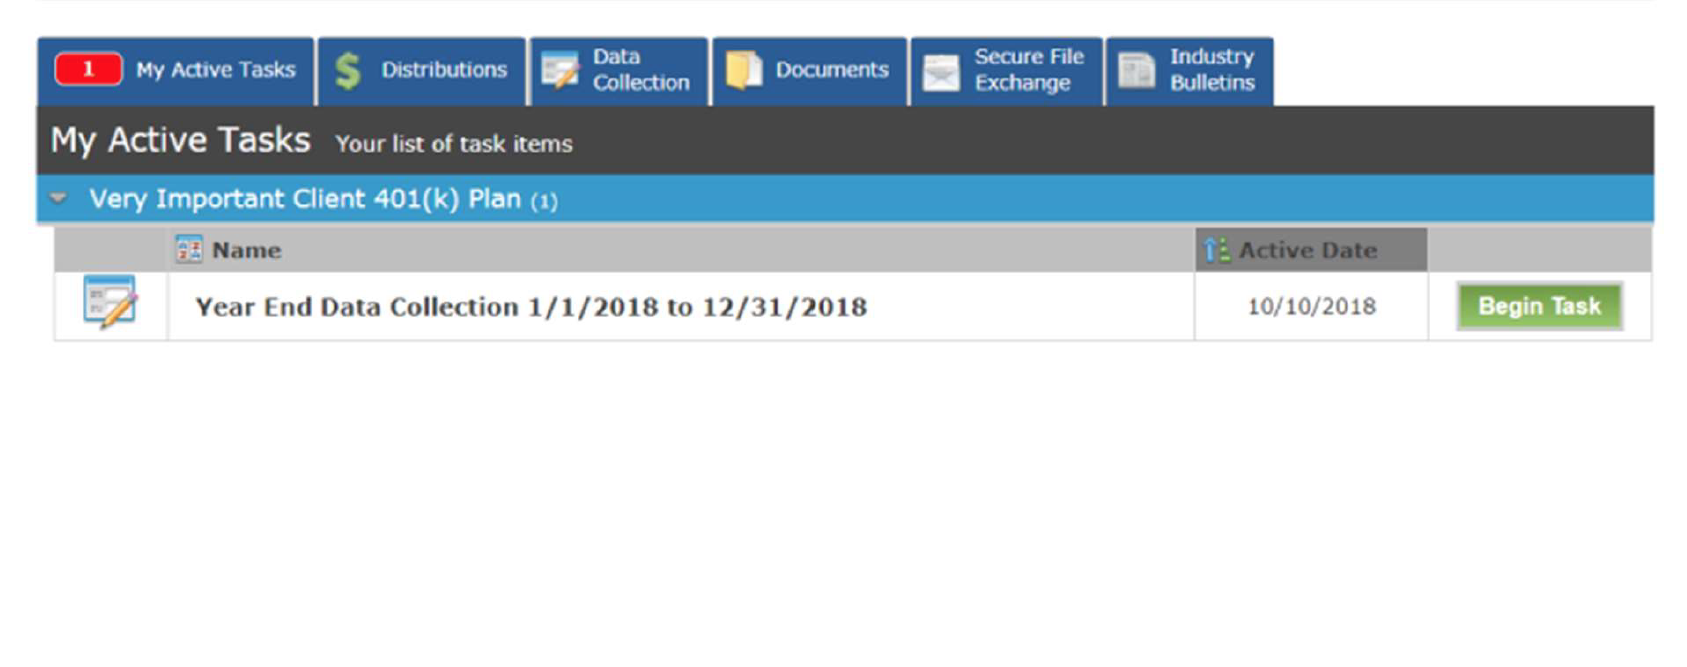
Once you have successfully logged on, you can find the Annual Data Collection under My Active Tasks.
Please click ![]() when you are ready to begin. There will be more help files like this one if you have a question during this process. Please remember to save your progress as you continue. If you need to stop for any reason, your progress will continue from your last save.
when you are ready to begin. There will be more help files like this one if you have a question during this process. Please remember to save your progress as you continue. If you need to stop for any reason, your progress will continue from your last save.
Step 1 - Company Contact Information
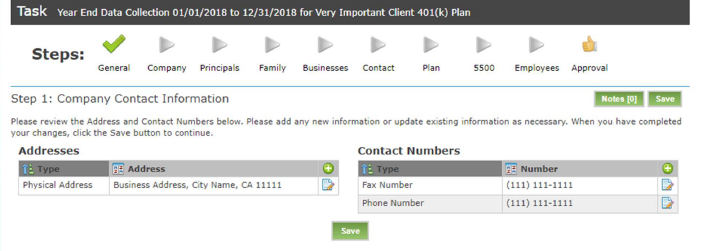
Step 1: Company Contact
The first step is very basic. The information needed is your business’s addresses (Physical, Mailing etc.) and various contact numbers such as FAX and Phone. Any additions can be made by clicking the ![]() . If any information has changed, you can click the
. If any information has changed, you can click the ![]() to make edits. This button also allows to you to fix any errors, or reopen a prior submission.
to make edits. This button also allows to you to fix any errors, or reopen a prior submission.
If there is a special consideration or additional information, please use the ![]() button to leave a message for the administration team. When you have completed your changes, click either button to continue.
button to leave a message for the administration team. When you have completed your changes, click either button to continue.
Step 2 - Employer Company Data
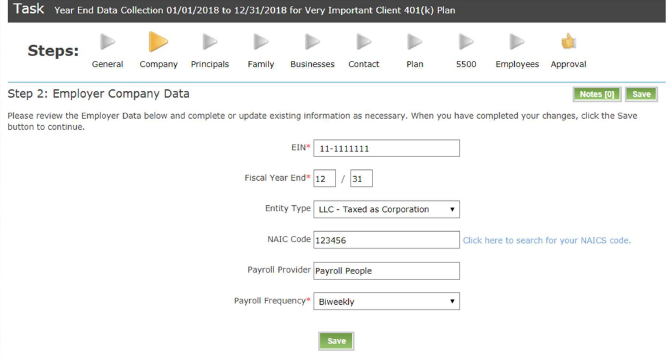
Step 2: Employer Company Data
This step asks for the:
- Employer Identification Number (EIN)
- Fiscal Year End -Entity Type (Type of business for filing purposes)
- North American Industry Classification System (NAICS) Code (typically six digits)
- Payroll Provider (in house or outside company)
- Payroll Frequency
If there is a special consideration or additional information, please use the ![]() button to leave a message for the administration team. When you have completed your changes, click either
button to leave a message for the administration team. When you have completed your changes, click either ![]() button to continue.
button to continue.
Step 3 - Principals
Step 3: Principles
This step is requesting the ownership percentages of the company and also if there is any employee who is counted as an officer. While this question may seem arbitrary, officers and owners make a difference for Plan Compliance so please take your time and answer as accurately as possible. Use the ![]() to add a principal. If any information has changed, you can click the
to add a principal. If any information has changed, you can click the ![]() to make edits. This button also allows to you to fix any errors, or reopen a prior submission. Click on the
to make edits. This button also allows to you to fix any errors, or reopen a prior submission. Click on the![]() to completely delete an entry.
to completely delete an entry.
If there is a special consideration or additional information, please use the ![]() button to leave a message for the administration team. When you have completed your changes, click either
button to leave a message for the administration team. When you have completed your changes, click either ![]() button to continue.
button to continue.
Step 4 - Family
Step 4: Family Relationships
This step is requesting the immediate family relationships of the principals of the company that were completed in the prior step. While this question may seem arbitrary, employees who are family members of principals may be considered to have ownership percentages determined by IRS Regulations that can make a difference for Plan Compliance so please take your time and answer as accurately as possible. Use the to ![]() add a relationship. If any information has changed, you can click the
add a relationship. If any information has changed, you can click the ![]() to make edits. This button also allows to you to fix any errors, or reopen a prior submission. To delete an entry, click on the
to make edits. This button also allows to you to fix any errors, or reopen a prior submission. To delete an entry, click on the![]() .
.
If there is a special consideration or additional information, please use the button to leave a message for the administration team. When you have completed your changes, click either ![]() button to continue.
button to continue.
Step 5 - Other Businesses Owned
Step 5: Other Businesses Owned
This step is intended to check if the retirement plan is considered to be a Controlled Group under IRS Regulations. Depending on the other businesses the employer may have, the retirement plan may need to be tested as a Controlled Group. Please fill out any other current businesses that the employer has partial or full ownership of. This information needs to be accurate for this determination to be made. This includes any businesses in which the spouse of the owner has ownership as well. Use the ![]() to add a business. If any information has changed, you can click the
to add a business. If any information has changed, you can click the ![]() to make edits. This button also allows to you to fix any errors, or reopen a prior submission. Click on the
to make edits. This button also allows to you to fix any errors, or reopen a prior submission. Click on the ![]() to completely delete an entry.
to completely delete an entry.
If there is a special consideration or additional information, please use the ![]() button to leave a message for the administration team. When you have completed your changes, click either
button to leave a message for the administration team. When you have completed your changes, click either ![]() button to continue.
button to continue.
Step 6 - Contacts
Step 6: Contacts
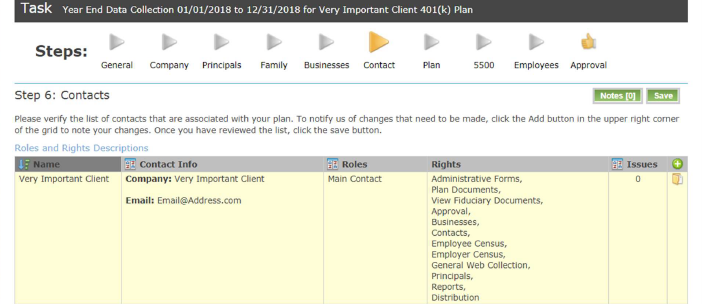
This step is an opportunity for you to verify who has access to PlanSponsorLink and with what permissions. Please mark what issues you have with a contact by clicking the ![]() button. This step serves only to check all the current contacts setup for your Web Portal. If you wish to add or remove a person, please fill out our PlanSponsorLink Contact Permissions Form which can be found in the Industry Bulletins tab.
button. This step serves only to check all the current contacts setup for your Web Portal. If you wish to add or remove a person, please fill out our PlanSponsorLink Contact Permissions Form which can be found in the Industry Bulletins tab.
If there is a special consideration or additional information, please use the ![]() button to leave a message for the administration team. When you have completed your changes, click either
button to leave a message for the administration team. When you have completed your changes, click either ![]() button to continue.
button to continue.
Step 7 - Annual Employer Questionnaire
Step 7: Annual Employer Questionnaire
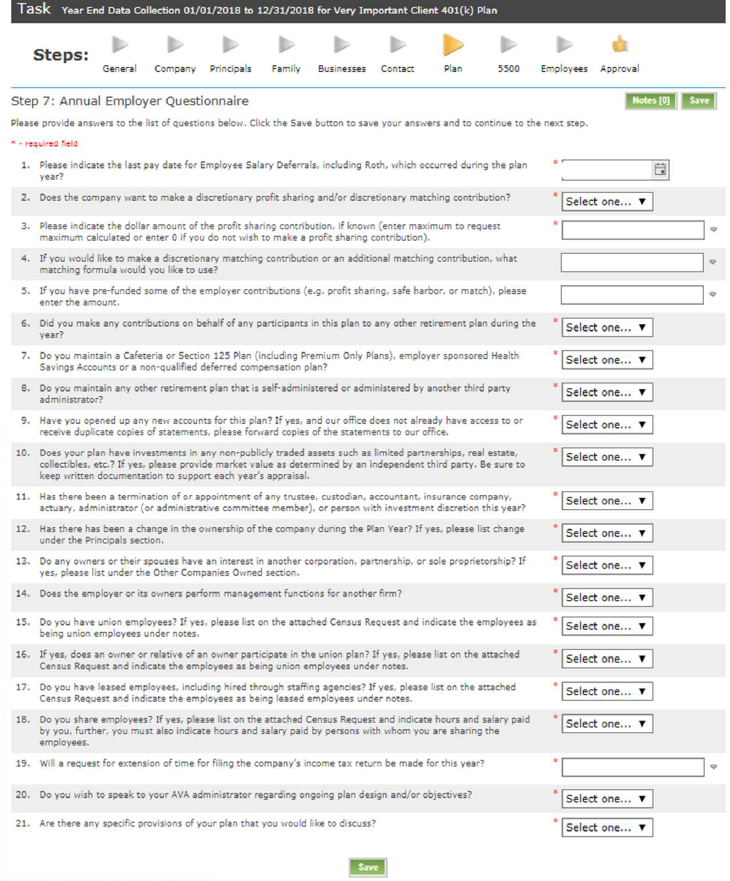
This step is a common type questionnaire asking general questions about the company, payroll, plan changes, and if the employer has a contribution calculation they would like to have run by our office. The answers can be filled out on the right hand side of the sheet by using the drop down Yes/No fields or available text fields. Please note that the questions with (*) are required fields. If there is a special consideration or additional information, please use the ![]() button to leave a message for the administration team. When you have completed your changes, click either
button to leave a message for the administration team. When you have completed your changes, click either ![]() button to continue.
button to continue.
Step 8 - 5500 Questionnaire
Step 8: 5500 Questionnaire
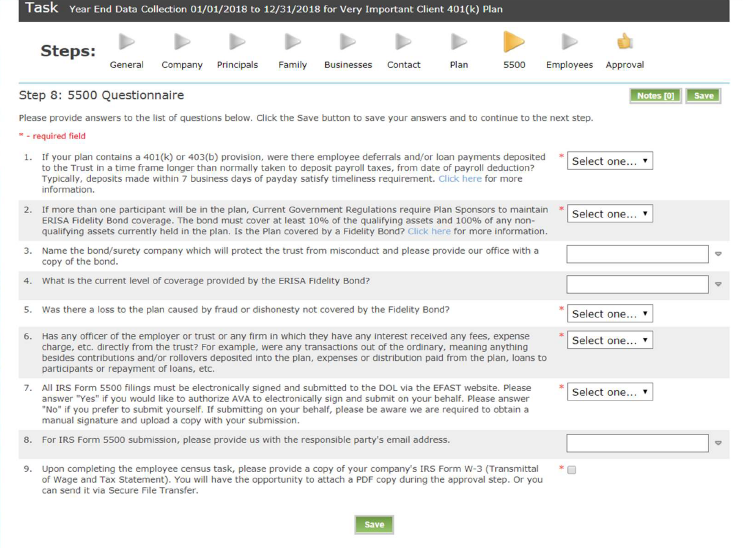
This page can be completed by using the fields on the right hand side of the page. This step is used for the annual filing of the Form 5500. The first question is to check if there have been any late deposits of employee pre-tax deferrals. A deposit is considered to be late if made after 7 business days of the paydate. Questions 2-5 relate to an Erisa Bond which is similar to Insurance for the plan assets and is required to cover at least 10% of the plan asset total. Regardless if the bond has not changed since the prior year, please fill out these questions fully. Questions 7-9 ask who will be filing the Form 5500, who the contact is in your company responsible for signing the Form 5500, and lastly, to provide our office with a copy of the W-3. See help for uploading the W-3 on the next page.
If there is a special consideration or additional information, please use the ![]() button to leave a message for the administration team. When you have completed your changes, click either
button to leave a message for the administration team. When you have completed your changes, click either ![]() button to continue.
button to continue.
Uploading the W-3
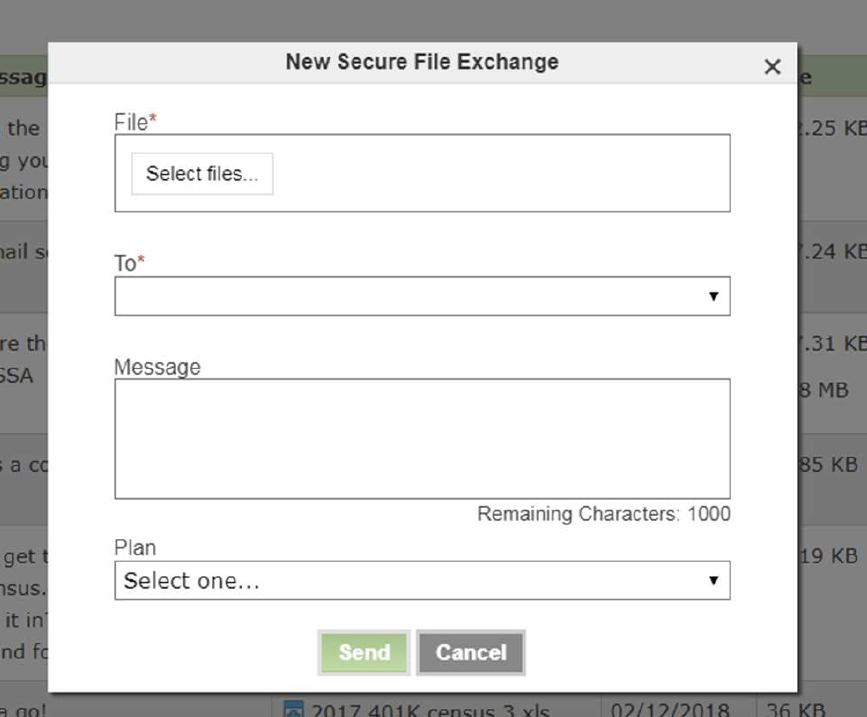
This can be sent via Secure File Exchange by clicking the Tab and then ![]() , or by uploading it into Documents in the Approval step (Step 10) by clicking the
, or by uploading it into Documents in the Approval step (Step 10) by clicking the ![]() .
.
Step 9 - Employee Census
Step 9: Employee Census
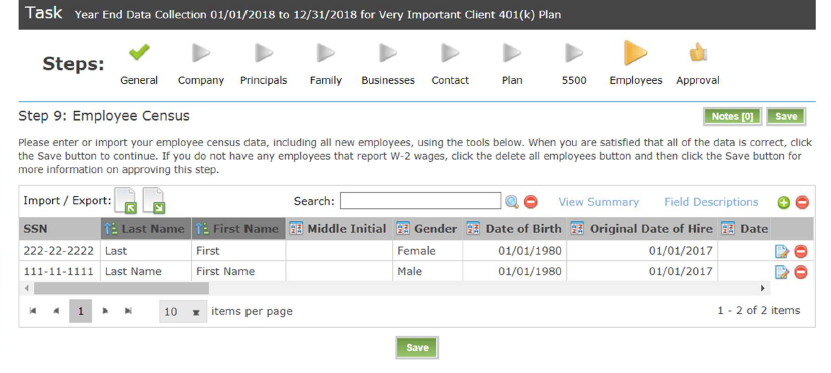
This item is typically the most time consuming but also one of the most important. This step requires a FULL employee census with ALL employees that worked in the given plan year. The information needs to be complete and correct for Compliance Testing and IRS Filings. It is required that all employees information be provided during the given plan year regardless if they are currently participating into the plan. Even if an employee is not currently eligible for the plan, they are still included in required testing, and can also be automatically included once eligible.
There are two methods of entering employees into the census. The first method is through the Web Portal. Click the to add an employee. This will pull up a single employee entry and will need to be filled out for each employee. This method is great for smaller companies with a few employees. The main fields that will apply to most companies and will need to be filled out are as follows:
- Social Security Number
- Full Name
- Date of Birth
- Date of Hire
- Gross Compensation
- Total hours (based on the year and includes any paid sick, vacation hours etc.)
- Any deferrals made by the employee
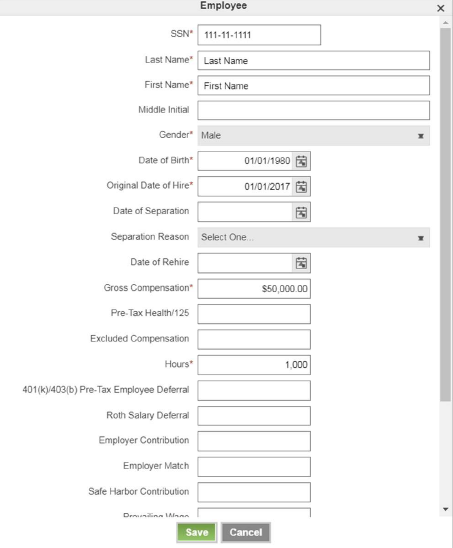
You may also click the ![]() to make edits at any time. This button also allows to you to fix any errors, or reopen a prior submission. Click on the
to make edits at any time. This button also allows to you to fix any errors, or reopen a prior submission. Click on the ![]() to completely delete an entry.
to completely delete an entry.
If there is a special consideration or additional information, please use the ![]() button to leave a message for the administration team. When you have completed your changes, click either
button to leave a message for the administration team. When you have completed your changes, click either![]() button to continue.
button to continue.
Importing Your Census
This step requires a FULL employee census with ALL employees that worked in the given plan year. The information needs to be complete and correct for Compliance Testing and IRS Filings. It is required that all employees information be provided during the given plan year regardless if they are currently participating into the plan. Even if an employee is not currently eligible for the plan, they are still included in required testing, and can also be automatically included once eligible. The second method for completing the Employee Census step is to import the census via excel. THE FILE YOU UPLOAD MUST BE IN THE CORRECT TEMPLATE FORMAT. If the sheet you are trying to upload is not in the correct format, you will receive an error.
The template can be found by exporting the current census. The template can be obtained by clicking the ![]() button. It will prompt you to choose a file type, .xlsx is the most up to date type. If you are running an older version of excel, you may want to opt for .xls
button. It will prompt you to choose a file type, .xlsx is the most up to date type. If you are running an older version of excel, you may want to opt for .xls
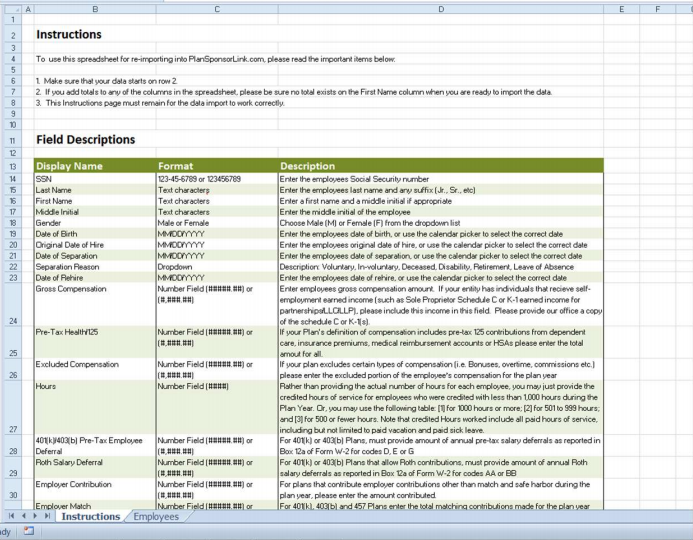
Once you save and open the file, it will open up to look like image above. This is the instructions page which explains the type of information that needs to be in each column. The columns will be found on the next worksheet in the file, which will also be where you can enter in your company’s data. To go to the next sheet in the excel file, look towards the bottom where says Instructions and Employees. Click the Employees sheet. MAKE SURE NOT TO DELETE THE INSTRUCTION PAGE OR CHANGE THE COLUMN HEADERS.
Not all columns may apply to your company. Most companies will fill out the following:
- Social Security Number
- Full Name
- Date of Birth
- Date of Hire
- Gross Compensation
- Total hours (based on the year and includes any sick, vacation hours etc.)
- Any deferrals made by the employee or employer
On the Employees sheet, there will be all the information that has been entered from the prior year (only the data that is constant between years such as Name and Date of Birth) or the data that has been entered into the Web Portal already.
Using the template, you can replace the existing data with information from your own data source. Alternatively, you can add to the data that you have exported from PlanSponsorlink. The export may be a blank template if you are a new client and thus have no prior records in our system to export.
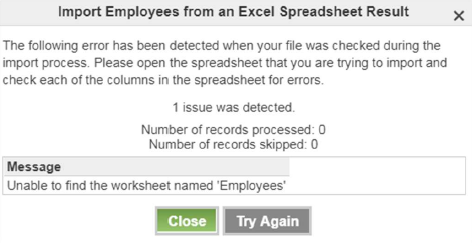
Once you have included all employees into the census (all employees who have worked during the plan year) you can now import the spreadsheet to the Web Portal. This can be done by clicking the ![]() button. This will allow you to select your file for import. There are various checks that occur during the import process and if you data does not import successfully you will be given issues that must be resolved before the import will be successful.
button. This will allow you to select your file for import. There are various checks that occur during the import process and if you data does not import successfully you will be given issues that must be resolved before the import will be successful.
![]()
Click to view the issues and resolve them before moving to the next step. We understand that even with these instructions, this can still be very confusing. Please do not hesitate to call our office at (559) 447-1600. Please let whoever picks up the phone know you have questions about uploading the Employee Census and for which plan. You will be connected to someone who can help.
If there is a special consideration or additional information, please use the ![]() button to leave a message for the administration team. When you have completed your changes, click either button to continue.
button to leave a message for the administration team. When you have completed your changes, click either button to continue.
Step 10 - Approval
Step 10: Approval and Census Submission
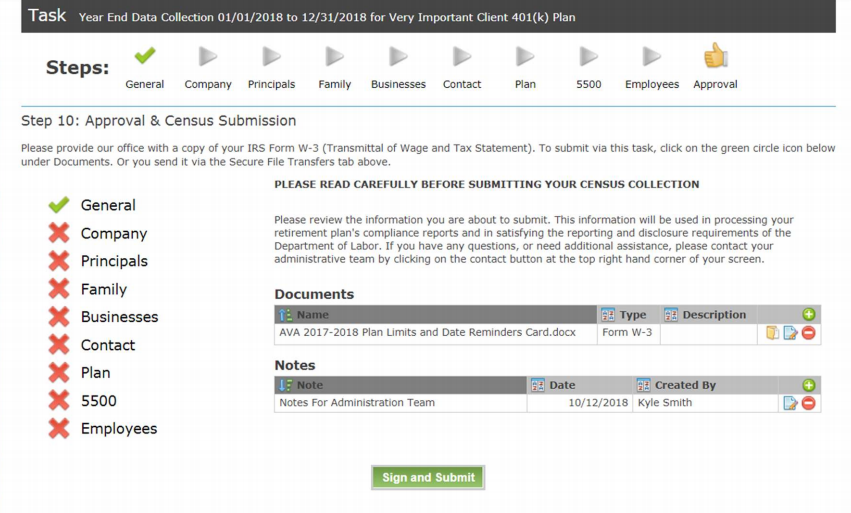
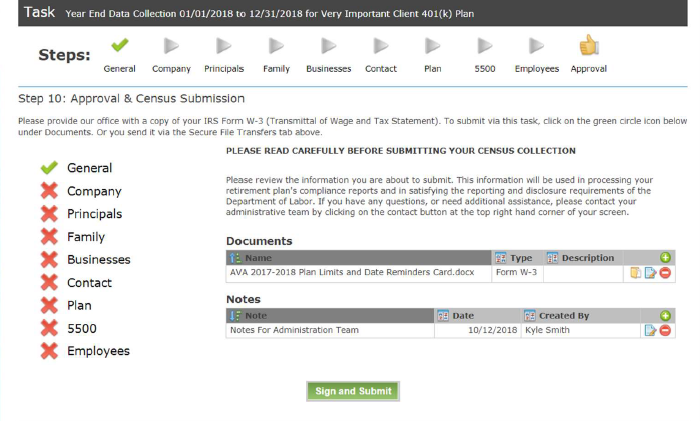
This is the final step of the data collection process. This page will show if the previous steps have been completed and also allow you to upload a copy of your W-3 and ERISA bond. Use the to ![]() add a document. You can click the
add a document. You can click the![]() to make edits. This button also allows to you to fix any errors, or reopen a prior submission. Click on the
to make edits. This button also allows to you to fix any errors, or reopen a prior submission. Click on the ![]() to completely delete an entry.
to completely delete an entry.
You may review any of the prior steps and notes before submission. Everything should have a ![]() show it has been completed. Any item with a
show it has been completed. Any item with a ![]() will require you attention.
will require you attention.
Once you are sure that all the data you have provided is correct, please click the ![]() button. Please be aware that the information provided will be review by our team, but what has been provided is what WILL be used in determining if you plan is in compliance with IRS Regulations. By clicking
button. Please be aware that the information provided will be review by our team, but what has been provided is what WILL be used in determining if you plan is in compliance with IRS Regulations. By clicking ![]() below, you will be verifying the information provided as complete and correct with the knowledge this information will be used for:
below, you will be verifying the information provided as complete and correct with the knowledge this information will be used for:
- Processing the retirement plan’s compliance reports
- Satisfying the reporting and disclosure requirements of the Department of Labor
- Submission of filing for all applicable forms to the Internal Revenue Service
Using the Census Template
Using the Census Template
The template can be found on the Employees step of the Annual Data Collection (below)
The census template can be found by clicking the button indicated above. The button will outline two options for download. If you have a version of excel that is older than 2007, choose .XLS otherwise .XLSX is most likely the correct option. The download should appear in the bottom right hand corner of your web browser. If not, please check your pop-up blocker. Click the download to open the file. You should now have a census template that resembles the one below. If data has been entered previously, relevant employee data may already be populated in the download.
The spreadsheet contains two pages, the first one has brief descriptions of what each column is, and the second sheet is where you can enter in your employee’s data. If you are unsure about a column, please refer to the instruction sheet. If you are unable to find an answer, you can always call our office for assistance. Do not delete either sheet from your file or add/change the columns.
Once you are finished entering the applicable data for all employees, regardless of participation status, you may upload the excel file to PlanSponsorLink using

Where to Find the Letter of Direction
Using the Census Template
First step is to log onto PlanSponsorLink. Once you are logged in you will need to go into the ![]() Tab
Tab
Next you will want to sort the Distributions list to bring the most recent to the top. Click the ![]() header to bring the most recent distributions to the top of the list.
header to bring the most recent distributions to the top of the list.
Now that the most recent distributions are visible, select the Employee who’s ‘Letter of Direction’ you are trying to access. This can be done by clicking the ![]() button in the row with their name.
button in the row with their name.
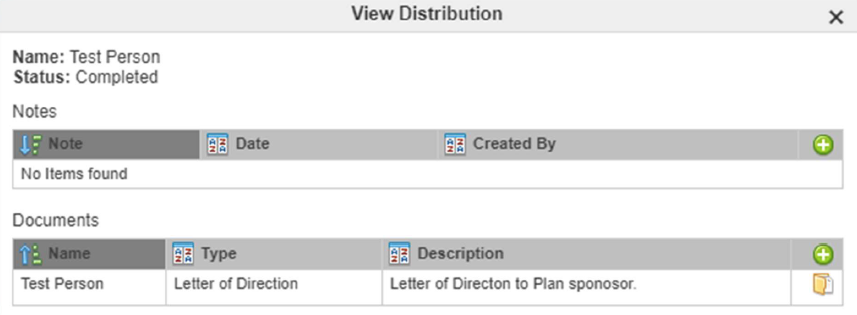
The box above will appear and the ‘Letter of Direction’ will appear in the second section labelled Documents. This will also be the p[lace to find any other documents related to the employee’s distribution. To download the file, click on the ![]() symbol. The document will appear in your browser. If it does not, please check if you have a ‘Pop-up Blocker’ enabled as this could prevent the file from opening.
symbol. The document will appear in your browser. If it does not, please check if you have a ‘Pop-up Blocker’ enabled as this could prevent the file from opening.
